Transitions
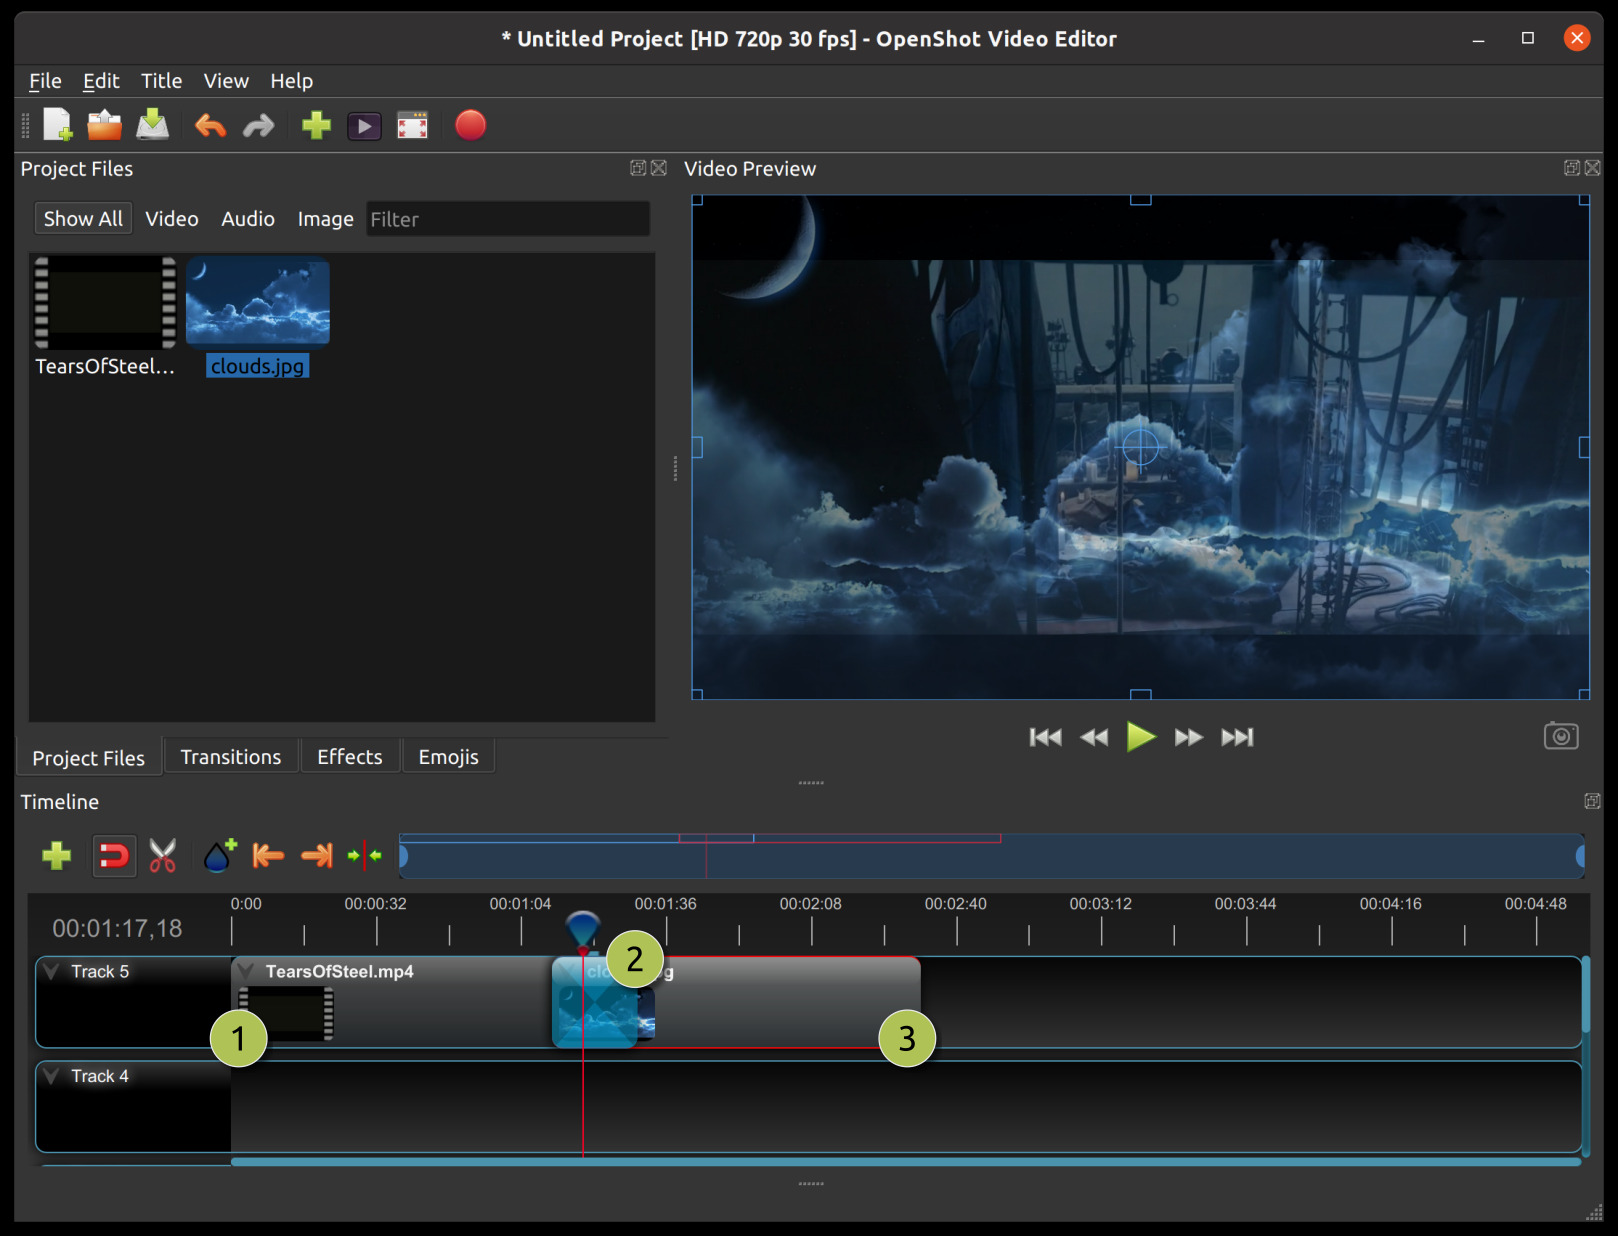
A transition is used to gradually fade (or wipe) between two clip images. In OpenShot, transitions are represented by blue, rounded rectangles on the timeline. They are automatically created when you overlap two clips, and can be added manually by dragging one onto the timeline from the Transitions panel. A transition must be placed on top of a clip (overlapping it), with the most common location being the beginning or end of a clip.
NOTE: Transitions do not affect audio, so if you are intending to fade in/out the audio volume of a clip,
you must adjust the volume clip property. See Clip Properties
Overview
# |
Name |
Description |
|---|---|---|
1 |
Clip 1 |
A video clip |
2 |
Transition |
A gradual fade transition between the 2 clip images, created automatically by overlapping the clips (does not affect the audio) |
3 |
Clip 2 |
An image clip |
Direction
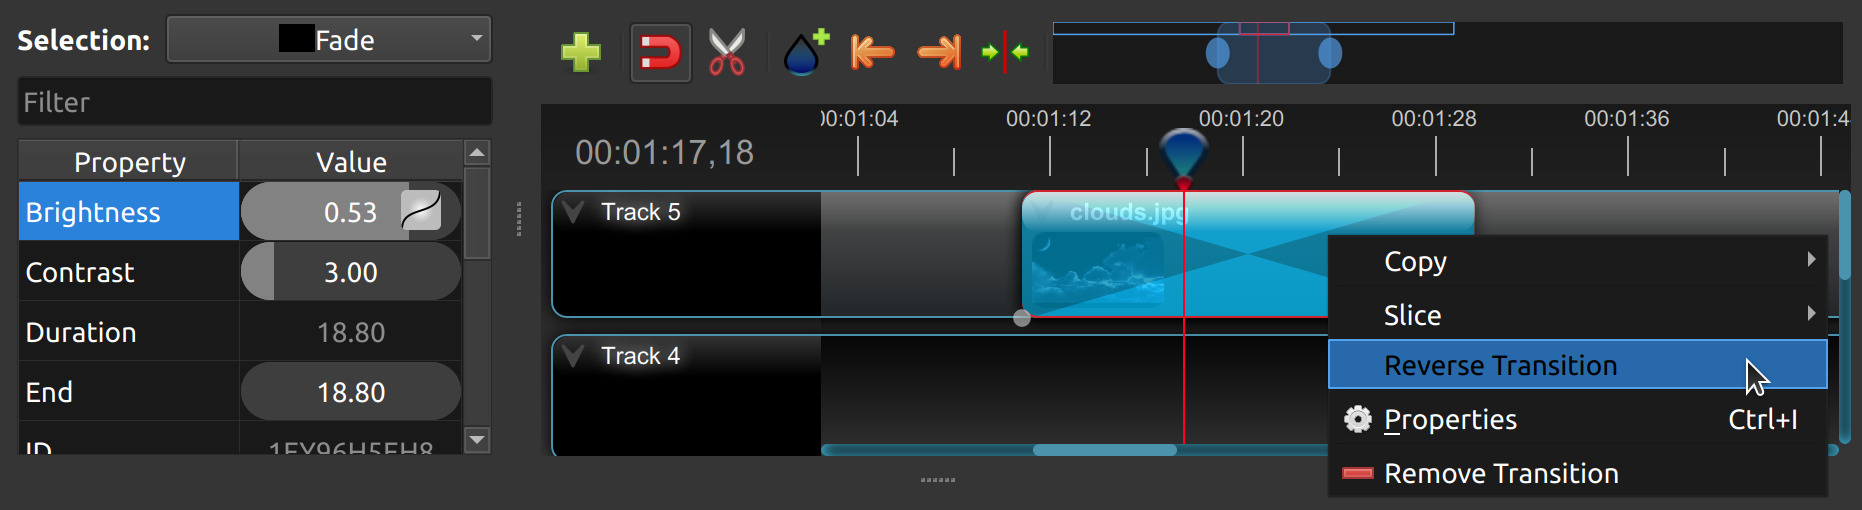
Transitions adjust the alpha/transparency of the overlapping clip image (i.e. the clip under the transition), and can either fade from opaque to transparent, or transparent to opaque (does not affect the audio). Right click and choose Reverse Transition to change the direction of the fade. You can also manually adjust the Brightness curve, animating the visual fade in any way you wish.
Transparency
If transitions are used on images or videos that contain transparency (i.e. alpha channel) this will result in the
original clip disappearing abruptly (or popping out of existence), since OpenShot’s transition system expects the 2nd
clip to fully cover up the first clip. For example, if the 2nd clip does not fully cover the first clip,
a transition might not be the best tool to use. Instead, you should consider adjusting the alpha property of the first
clip to make it fade out where needed, see Clip Properties or Context Menu. Alternatively, you can
combine a transition and alpha fade when using transparent clips to more smoothly fade between then.
Cutting & Slicing
OpenShot has many easy ways to adjust the start and end trim positions of a transition (otherwise known as cutting or trimming). The most common method is simply grabbing the left (or right) edge of the transition and dragging. For a complete guide to slicing and all available keyboard shortcuts, see the Trimming & Slicing and Keyboard Shortcuts sections.
Mask
In video editing, masks are powerful tools that allow you to selectively display specific areas of a video clip. Similar to masking in image editing, video masks define a region where changes will be applied while leaving other parts of the video unaffected.
A mask can be thought of as a shape or path that outlines the area you want to target. Commonly used shapes include rectangles, circles, and freeform paths. The masked area is referred to as the “masked region.”
Masks can be animated, allowing you to change the shape or position over time. This enables dynamic effects like revealing hidden elements or transitioning between different visual states. In OpenShot, you can convert a transition to a mask, by customizing the Brightness key-frame curve. Keeping a static (unchanging) value of brightness, will maintain a fixed mask location. Combine this with custom transition images, or even custom image sequences, to create animated, complex masks.
Custom Transition
Any greyscale image can be used as a transition (or mask), by adding it to your ~/.openshot_qt/transitions/ folder. Just
be sure to name your file something that is easily recognizable, and restart OpenShot. Your custom transition/mask will now show
up in the list of transitions.
Transition Properties
Below is a list of transition properties which can be edited, and in most cases, animated over time. To view a transition’s properties, right click and choose Properties. The property editor will appear, where you can change these properties. NOTE: Pay close attention to where the play-head (i.e. red playback line) is. Key frames are automatically created at the current playback position, to help create animations.
NOTE: Transitions do not affect audio, so if you are intending to fade in/out the
audio volume of a clip, you must adjust the volume clip property. See Clip Properties.
Transition Property Name |
Type |
Description |
|---|---|---|
Brightness |
Key-frame |
Curve representing the brightness of the transition image, which affects the fade/wipe (-1 to 1) |
Contrast |
Key-frame |
Curve representing the contrast of the transition image, which affects the softness/hardness of the fade/wipe (0 to 20) |
Duration |
Float |
The length of the transition (in seconds). Read-only property. |
End |
Float |
The end trimming position of the transition (in seconds). |
ID |
String |
A randomly generated GUID (globally unique identifier) assigned to each transition. Read-only property. |
Parent |
String |
The parent object to this transition, which makes many of these keyframe values initialize to the parent value. |
Position |
Float |
The position of the transition on the timeline (in seconds). |
Replace Image |
Bool |
For debugging a problem, this property displays the transition image (instead of becoming a transparency). |
Start |
Float |
The start trimming position of the transition (in seconds). |
Track |
Int |
The layer which holds the transition (higher tracks are rendered on top of lower tracks). |
Duration
The Duration property is a float value indicating the length of the transition in seconds. This is a Read-only property. This is calculated by: End - Start. To modify duration, you must edit the Start and/or End transition properties.
Usage Example: Inspect the duration of a transition to ensure it fits a specific time slot in the project.
Tip: Consider using the “Duration” property for transitions that need to match specific time intervals, such as dialogue or scenes.
End
The End property defines the trimming point at the end of the transition in seconds, allowing you to control how much of the transition is visible in the timeline. Changing this property will impact the Duration transition property.
Usage Example: Trimming the end of a transition to align with another clip or trimming off unwanted sections of the transition.
Tip: Combine the “Start” and “End” properties to precisely control the visible portion of the transition.
ID
The ID property holds a randomly generated GUID (Globally Unique Identifier) assigned to each transition, ensuring its uniqueness. This is a Read-only property, and assigned by OpenShot when a transition is created.
Usage Example: Referencing specific transitions within custom scripts or automation tasks.
Tip: While typically managed behind the scenes, understanding transition IDs can aid in advanced project customization.
Track
The Track property is an integer indicating the layer on which the transition is placed. Transitions on higher tracks are rendered above those on lower tracks.
Usage Example: Arranging transitions in different layers for creating visual depth and complexity.
Tip: Use higher tracks for elements that need to appear above others, like text overlays or graphics.