Main Window
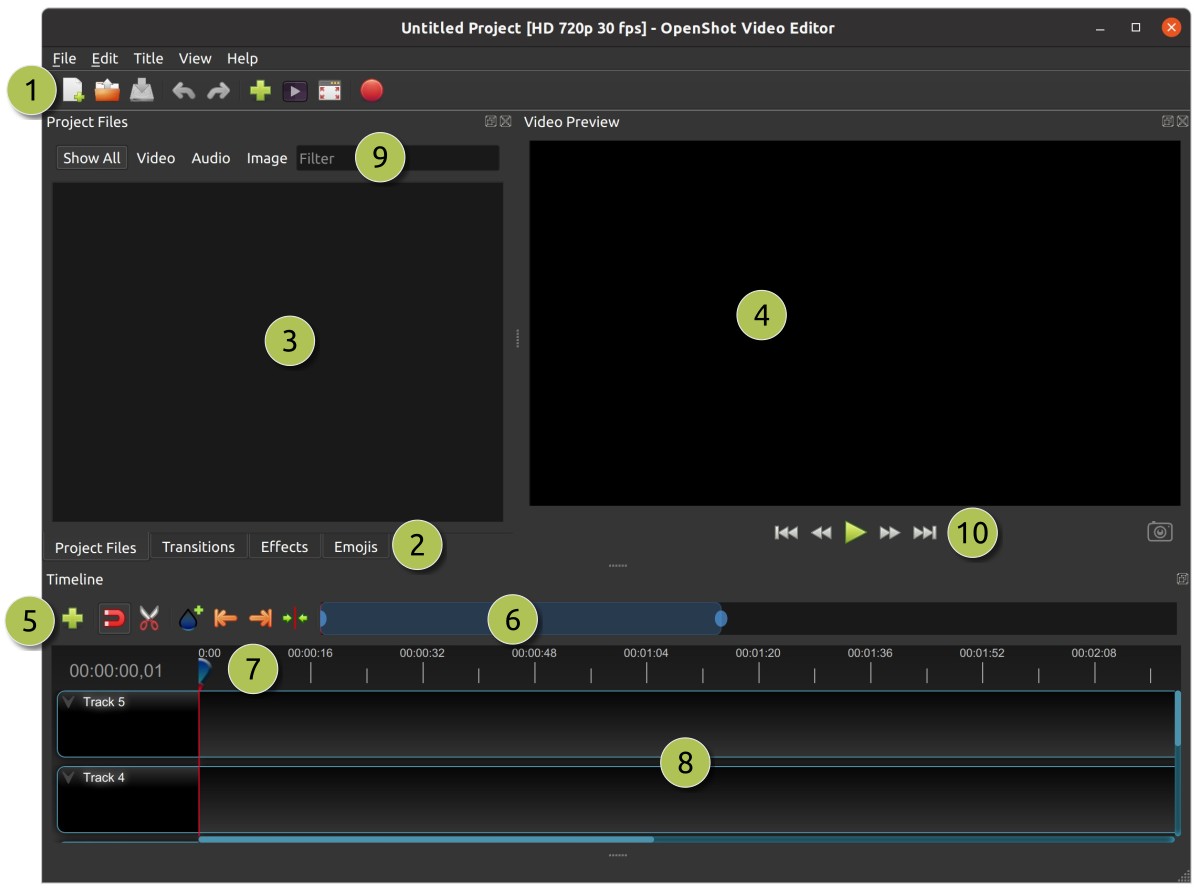
OpenShot Video Editor has one main window which contains most of the information, buttons, and menus needed to edit your video project.
Overview

# |
Name |
Description |
|---|---|---|
1 |
Main Toolbar |
Contains buttons to open, save, and export your video project. |
2 |
Function Tabs |
Switch between Project Files, Transitions, Effects, and Emojis. |
3 |
Project Files |
All audio, video, and image files that have been imported into your project. |
4 |
Preview Window |
This is the area that the video will playback on the screen. |
5 |
Timeline Toolbar |
This toolbar contains buttons used for snapping, inserting markers, slicing razor, jumping between markers, and centering the timeline on the playhead. See Timeline Toolbar. |
6 |
Zoom Slider |
This slider will adjust the time-scale of your timeline. Drag the left or right edge to zoom in or out. Drag the blue area to scroll the timeline left or right. Clips and transitions are displayed as simple rectangles, to give you context for adjusting the zoom to specific clips. |
7 |
Play-head / Ruler |
The ruler shows the time-scale, and the red line is the play-head. The play-head represents the current playback position. Hold Shift key while dragging the playhead to snap to nearby clips. |
8 |
Timeline |
The timeline visualizes your video project, and each clip and transition in your project. You can drag the mouse to select, move, or delete multiple items. |
9 |
Filter |
Filter the list of items shown (project files, transitions, effects, and emojis) by using these buttons and filter textbox. Enter a few letters of what you are looking for, and the results will be shown. |
10 |
Playback |
Left to Right: Jump to Start, Rewind, Play/Pause, Fast Forward, and Jump to End |
For step-by-step instructions on the basic usage of OpenShot, be sure to read the Quick Tutorial.
Built-in Tutorial
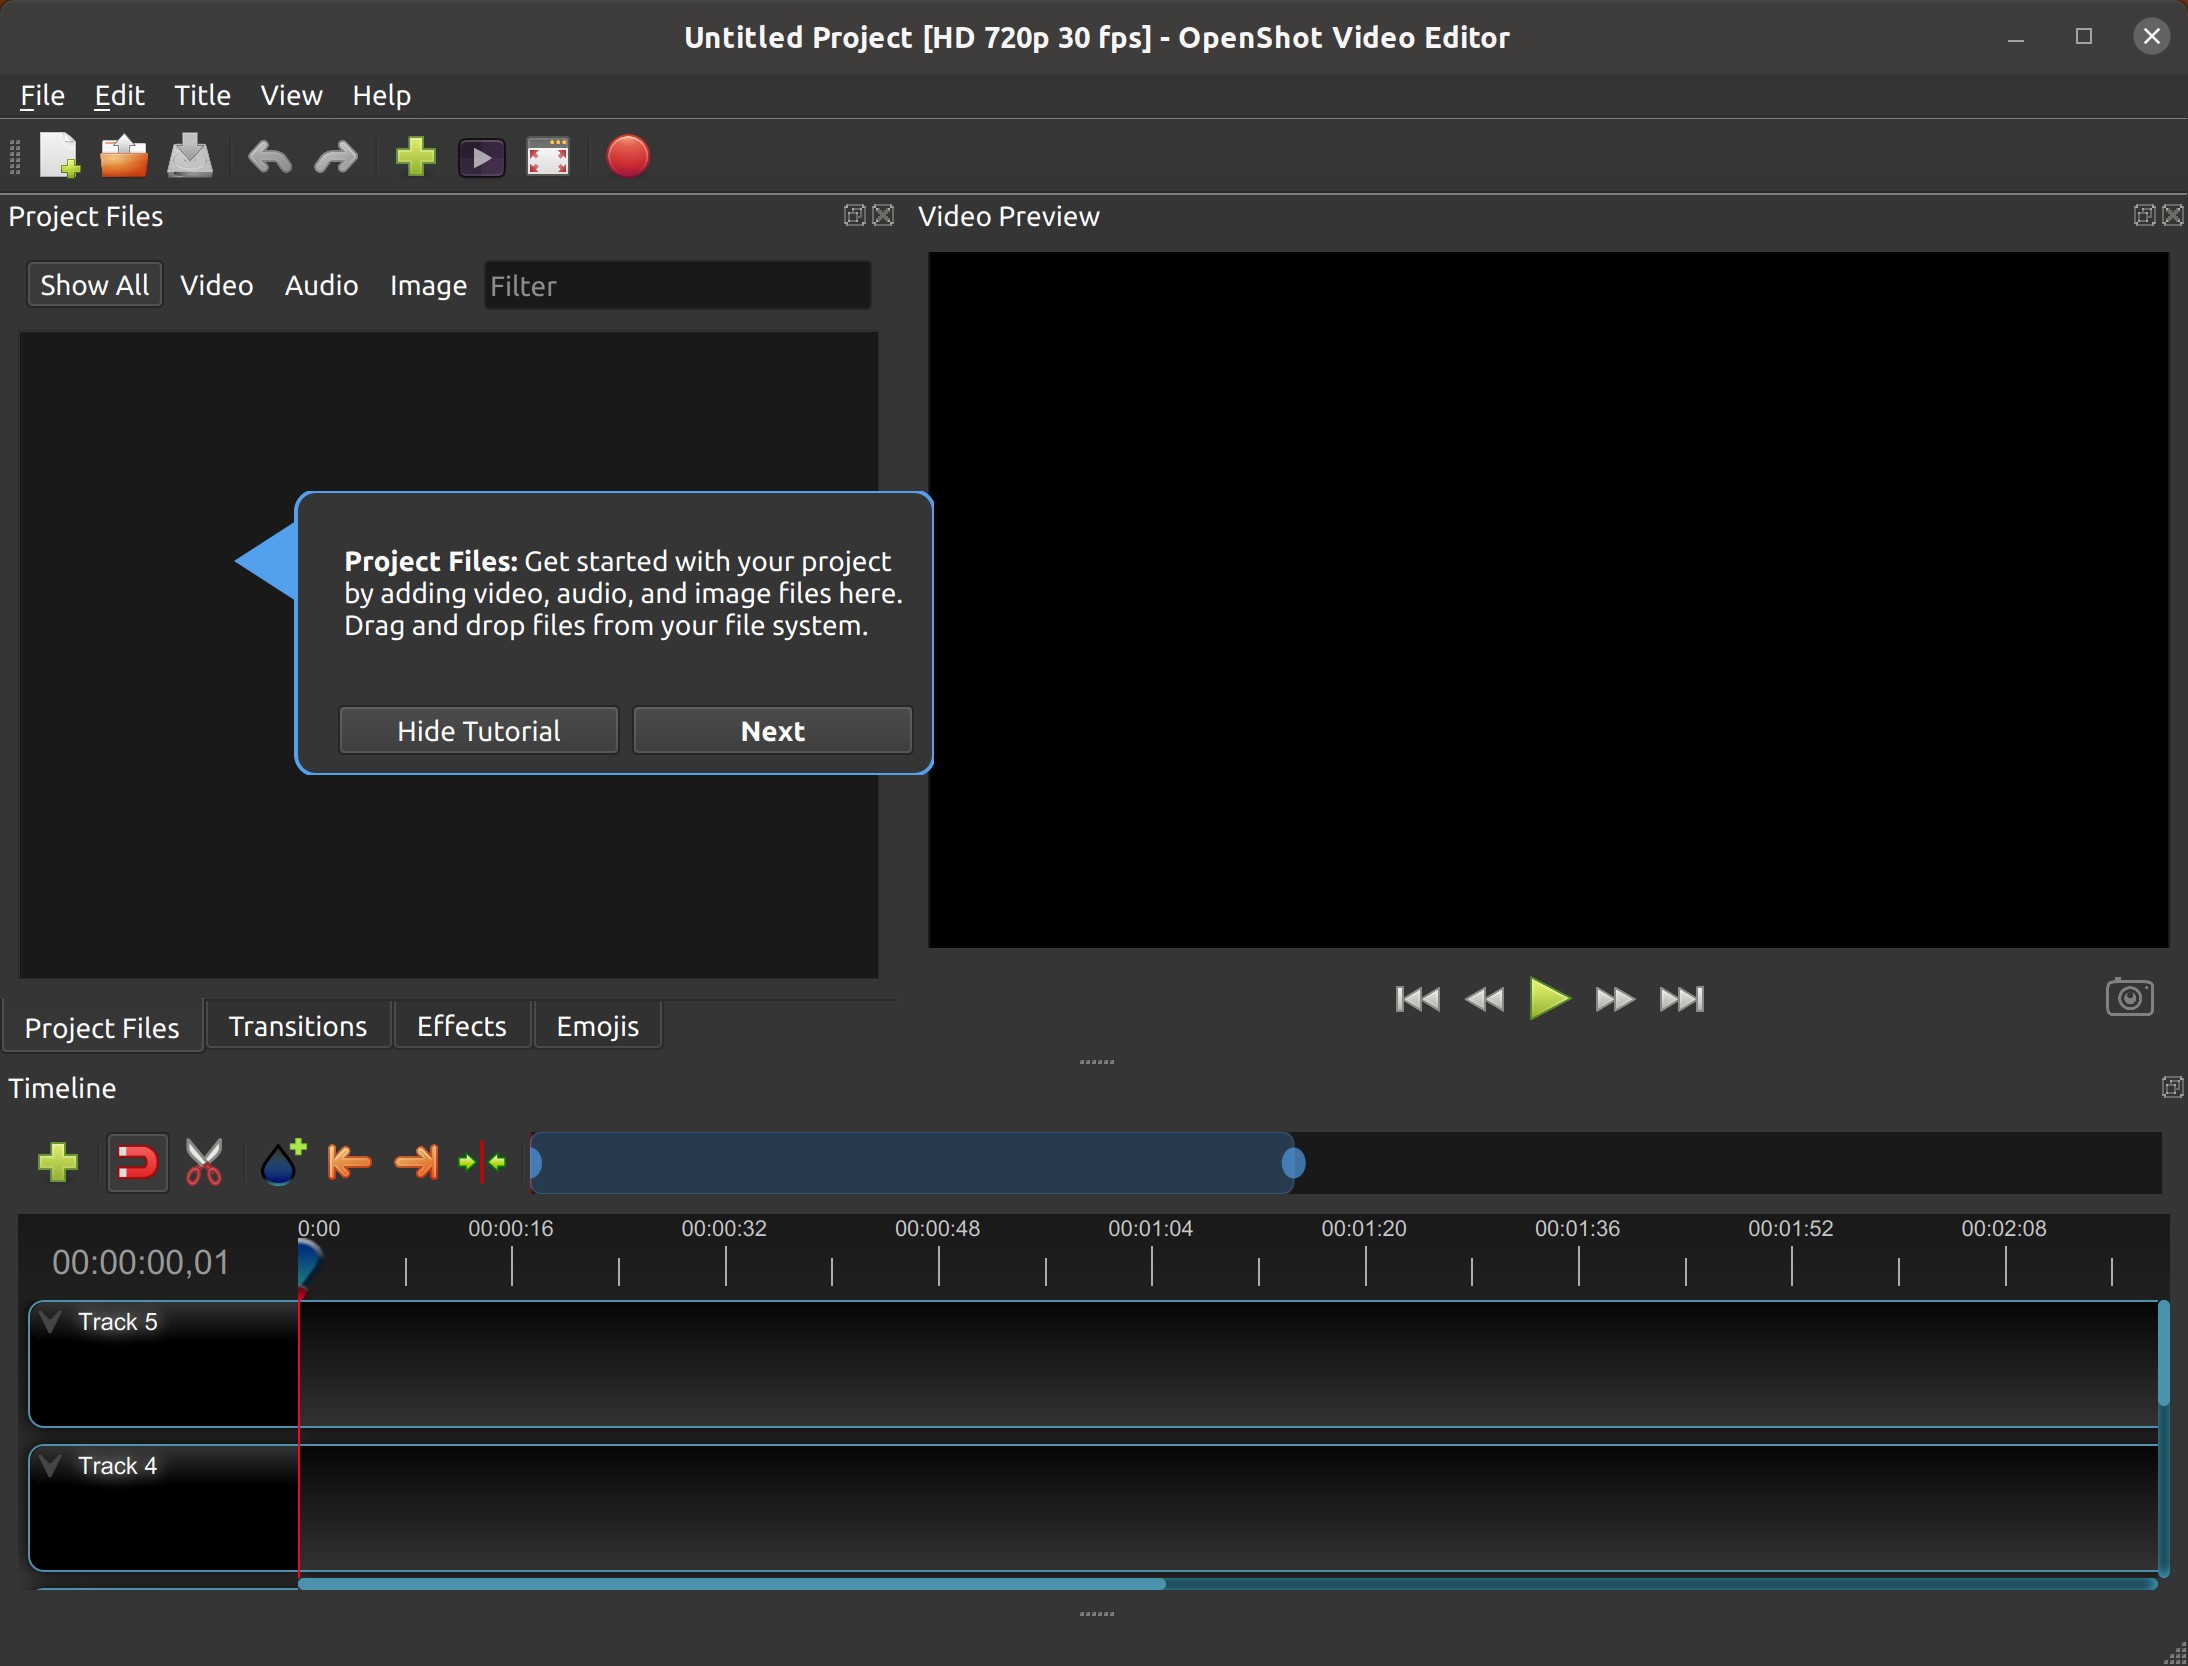
When you first launch OpenShot, you will be presented with a friendly built-in tutorial. It will demonstrate and explain the basics. Clicking Next will jump to the next topic. You can always view this tutorial again from the Help→Tutorial menu.

Tracks & Layers
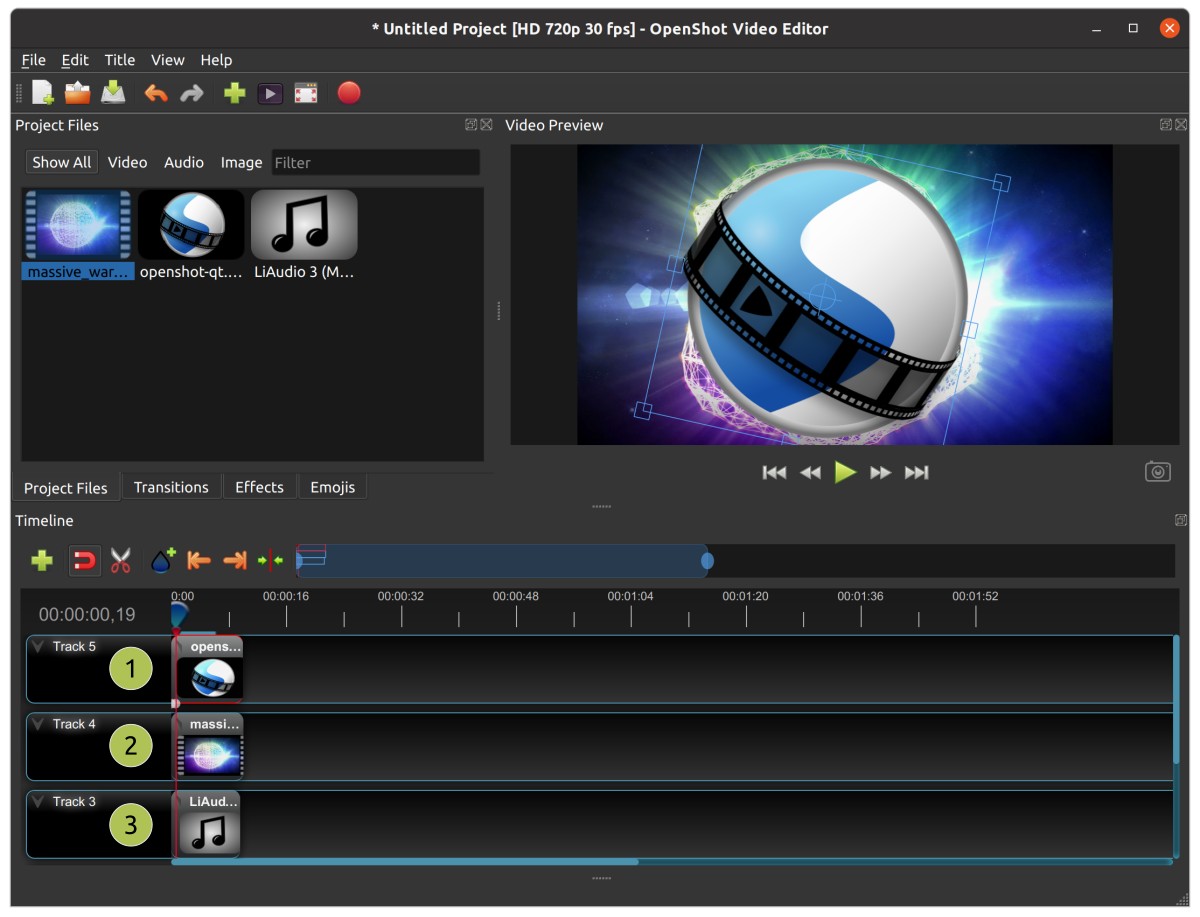
OpenShot uses tracks to layer videos and images. The top most track is the top layer, and the bottom track is the bottom layer. If you are familiar with layers in a photo editing application, then you should be quite familiar with this concept. OpenShot will stack the layers and mix each one together, just like a photo editing application. You can have an unlimited number of tracks, but typically a simple video project will not need more than 5 tracks.
For example, imagine a 3 track video project

# |
Name |
Description |
|---|---|---|
1 |
Top Track |
Clips on this track will always be on top and visible. Often watermarks and titles are placed on higher tracks. |
2 |
Middle Track |
Clips in the middle (might or might not be visible, depending on what is above them) |
3 |
Bottom Track |
Clips on this track will always be on the bottom. Often audio clips are placed on lower tracks. |
Timeline Toolbar

Name |
Description |
|---|---|
Add Track |
Add a new track to the timeline. New projects start with 5 tracks by default. |
Snapping |
Toggle between snapping and non-snapping modes. Snapping makes it easier to place clips next to other clips. |
Timing Tool |
Toggle retiming mode. Drag clip edges to slow down or speed up playback without trimming; all keyframes are scaled to fit the new length. |
Razor Tool |
Toggle the razor tool on and off. This tool will cut a clip exactly where you click on it, splitting a clip into 2 clips. |
Add Marker |
Add a marker to the timeline at the current playhead position. This can be useful for returning to a specific position on the timeline. |
Previous Marker |
Jump to the previous marker. This moves the playhead to the left, seeking to the next marker or important position (i.e. start / end positions of clips). |
Next Marker |
Jump to the next marker. This moves the playhead to the right, seeking to the next marker or important position (i.e. start / end positions of clips). |
Center Timeline on Playhead |
This centers the timeline on the playhead position. This can be useful if the playhead is not visible and you want to quickly scroll the timeline to that position. |
Zoom Slider |
This controls the visible portion of the timeline. Adjusting the left/right handles will zoom in/out of your timeline, keeping a specific section of your project in view. Double click to zoom to your entire timeline. |
Keyboard Shortcuts
Here is a list of the default keyboard shortcuts supported by OpenShot. You can configure these shortcuts in the Preferences window, which is opened by selecting Edit→Preferences from the OpenShot menu bar. (On macOS, choose OpenShot Video Editor→Preferences.) Learning a few of these shortcuts can save you a bunch of time!
Action |
Shortcut 1 |
Shortcut 2 |
Shortcut 3 |
|---|---|---|---|
About OpenShot |
Ctrl+H |
||
Add Marker |
M |
||
Add Track |
Ctrl+Y |
||
Add to Timeline |
Ctrl+Alt+A |
||
Advanced View |
Alt+Shift+1 |
||
Animated Title |
Ctrl+Shift+T |
||
Ask a Question… |
F4 |
||
Center on Playhead |
Shift+C |
Alt+Up |
|
Choose Profile |
Ctrl+Alt+P |
||
Clear All Cache |
Ctrl+Shift+ESC |
||
Clear History |
Ctrl+Shift+H |
||
Clear Waveform Display Data |
Ctrl+Shift+W |
||
Copy |
Ctrl+C |
||
Cut |
Ctrl+X |
||
Delete Item |
Delete |
Backspace |
|
Delete Item (Ripple) |
Shift+Delete |
||
Details View |
Ctrl+Page Up |
||
Donate |
F7 |
||
Duplicate |
Ctrl+Shift+/ |
||
Edit Title |
Alt+T |
||
Export Selected Files |
Ctrl+Shift+E |
||
Export Video / Media |
Ctrl+E |
Ctrl+M |
|
Fast Forward |
L |
||
File Properties |
Alt+I |
Ctrl+Double Click |
|
Freeze View |
Ctrl+F |
||
Fullscreen |
F11 |
||
Import Files… |
Ctrl+I |
||
Insert Keyframe |
Alt+Shift+K |
||
Join our Community… |
F5 |
||
Jump To End |
End |
||
Jump To Start |
Home |
||
Launch Tutorial |
F2 |
||
New Project |
Ctrl+N |
||
Next Frame |
Right |
. |
|
Next Marker |
Shift+M |
Alt+Right |
|
Nudge left (1 Frame) |
Ctrl+Left |
||
Nudge left (5 Frames) |
Shift+Ctrl+Left |
||
Nudge right (1 Frame) |
Ctrl+Right |
||
Nudge right (5 Frames) |
Shift+Ctrl+Right |
||
Open Help Contents |
F1 |
||
Open Project… |
Ctrl+O |
||
Paste |
Ctrl+V |
||
Play/Pause Toggle |
Space |
Up |
Down |
Preferences |
Ctrl+P |
||
Preview File |
Alt+P |
Double Click |
|
Previous Frame |
Left |
, |
|
Previous Marker |
Ctrl+Shift+M |
Alt+Left |
|
Properties |
U |
||
Quit |
Ctrl+Q |
||
Razor Toggle |
C |
B |
R |
Redo |
Ctrl+Shift+Z |
||
Report a Bug… |
F3 |
||
Rewind |
J |
||
Save Current Frame |
Ctrl+Shift+Y |
||
Save Current Frame |
Ctrl+Shift+Y |
||
Save Project |
Ctrl+S |
||
Save Project As… |
Ctrl+Shift+S |
||
Select All |
Ctrl+A |
||
Select Item (Ripple) |
Alt+A |
Alt+Click |
|
Select None |
Ctrl+Shift+A |
||
Show All Docks |
Ctrl+Shift+D |
||
Simple View |
Alt+Shift+0 |
||
Slice All: Keep Both Sides |
Ctrl+Shift+K |
||
Slice All: Keep Left Side |
Ctrl+Shift+J |
||
Slice All: Keep Right Side |
Ctrl+Shift+L |
||
Slice Selected: Keep Both Sides |
Ctrl+K |
||
Slice Selected: Keep Left Side |
Ctrl+J |
||
Slice Selected: Keep Right Side |
Ctrl+L |
||
Slice Selected: Keep Left (Ripple) |
W |
||
Slice Selected: Keep Right (Ripple) |
Q |
||
Snapping Toggle |
S |
||
Split File |
Alt+S |
Shift+Double Click |
|
Thumbnail View |
Ctrl+Page Down |
||
Timing Toggle |
T |
||
Title |
Ctrl+T |
||
Transform |
Ctrl+Alt+T |
||
Translate this Application… |
F6 |
||
Un-Freeze View |
Ctrl+Shift+F |
||
Undo |
Ctrl+Z |
||
View Toolbar |
Ctrl+Shift+B |
||
Zoom In |
= |
Ctrl+= |
|
Zoom Out |
- |
Ctrl+- |
|
Zoom to Timeline |
\ |
Shift+\ |
Double Click |
Views
The OpenShot main window is composed of multiple docks. These docks are arranged and snapped together into a grouping that we call a View. OpenShot comes with two primary views: Simple View and Advanced View.
Simple View
This is the default view, and is designed to be easy-to-use, especially for first-time users. It contains Project Files on the top left, Preview Window on the top right, and Timeline on the bottom. If you accidentally close or move a dock, you can quickly reset all the docks back to their default location using the View->Views->Simple View menu at the top of the screen.
Advanced View
This is an advanced view, which adds more docks to the screen at once, improving access to many features that are not visible in Simple View. Once you have mastered the Simple View, we recommend giving this view a try as well. NOTE: You can also drag and drop the docks anywhere you would like, for a fully custom view.
Docks
Each widget on the OpenShot main window is contained in a dock. These docks can be dragged and snapped around the main window, and even grouped together (into tabs). OpenShot will always save your main window dock layout when you exit the program. Re-launching OpenShot will restore your custom dock layout automatically.
Dock Name |
Description |
|---|---|
Captions |
Manage and add captions or subtitles to your video project. Allows you to create, edit, and manage caption data. See Caption effect. |
Effects |
Browse and apply video and audio effects to your video clips. Includes filters, color adjustments, and special effects. See Effects. |
Emojis |
Add emoji graphics to your video project. Choose from a variety of emojis to enhance your video content. |
Project Files |
View and manage all the media files imported into your project. Organize, filter, and tag video, audio, and image files. See Files. |
Properties |
View and edit the properties of a selected effect, transition, or clip. Adjust settings such as duration, size, position, etc… See Clip Properties. |
Transitions |
Browse and apply transitions between video clips. Choose from a variety of transition wipes to create smooth changes between scenes. See Transitions. |
Video Preview |
Preview the current state of your video project. Allows you to play back and review your edits in real-time. See Playback. |
If you have accidentally closed or moved a dock and can no longer find it, there are a couple easy solutions. First, you can use the View->Views->Simple View menu option at the top of the screen, to restore the view back to its default. Or you can use the View->Views->Docks->… menu to show or hide specific dock widgets on the main window.
High DPI / 4K Monitors
OpenShot Video Editor provides robust support for High DPI (Dots Per Inch) monitors, ensuring that the interface looks sharp and is easily readable on displays with various DPI settings. This support is particularly beneficial for users with 4K monitors or other high-resolution displays.
Per Monitor DPI Awareness
OpenShot is DPI aware on a per-monitor basis, meaning it can adjust its scaling dynamically depending on the DPI settings of each connected monitor. This ensures a consistent and high-quality user experience across different displays.
DPI Scaling on Windows
On Windows, OpenShot rounds the scaling factor to the nearest whole value to maintain visual integrity. This rounding helps avoid visual artifacts in the UI rendering and ensures that the interface elements remain crisp and well-aligned. Due to this rounding, scaling options can sometimes lead to increased font-sizes and a feeling that the UI elements are a bit too large.
125% scaling rounds to 100%
150% scaling rounds to 200%
Workarounds for Fine-Grained Adjustment
While rounding helps maintain a clean interface, there are workarounds for users who require more precise control over the scaling. However, these methods are not recommended due to potential visual artifacts:
QT_SCALE_FACTOR_ROUNDING_POLICY=PassThrough
Setting this environment variable can disable rounding and allow more precise scaling.
Note: This may cause visual artifacts, particularly in the timeline, and is not recommended.
QT_SCALE_FACTOR=1.25 (or similar value)
Manually setting the scale factor can provide finer adjustments to the font and UI scaling.
This can also be set via Preferences (User Interface Scale) - but expect border/line issues on Windows with fractional scales.
Note: This method can also lead to visual artifacts and make OpenShot harder to use.
For more info on adjusting these environment variables, please visit https://github.com/OpenShot/openshot-qt/wiki/OpenShot-UI-too-large.