Files
To create a video, we need to make media files available to our project by importing files into OpenShot. Most media file types are recognized, such as videos, images, and audio files. Files can be viewed and managed in the Project Files panel.
Note that imported files are not copied anywhere, they remain in the physical location they were before and are simply being made available to your video project. So, they must not be deleted, renamed, or moved after adding them to your project. The “Show All”, “Video”, “Audio”, “Image” filters above the files allows you to only see the file types you are interested in. You can also toggle the view between details and thumbnails view of your files.
Import Files
There are many different ways to import media files into an OpenShot project. When a file is imported successfully, it will be automatically selected and scrolled into view (in the Project Files panel). Also, if the Project Files panel is not currently visible, OpenShot will automatically display the panel.
Import File Method |
Description |
|---|---|
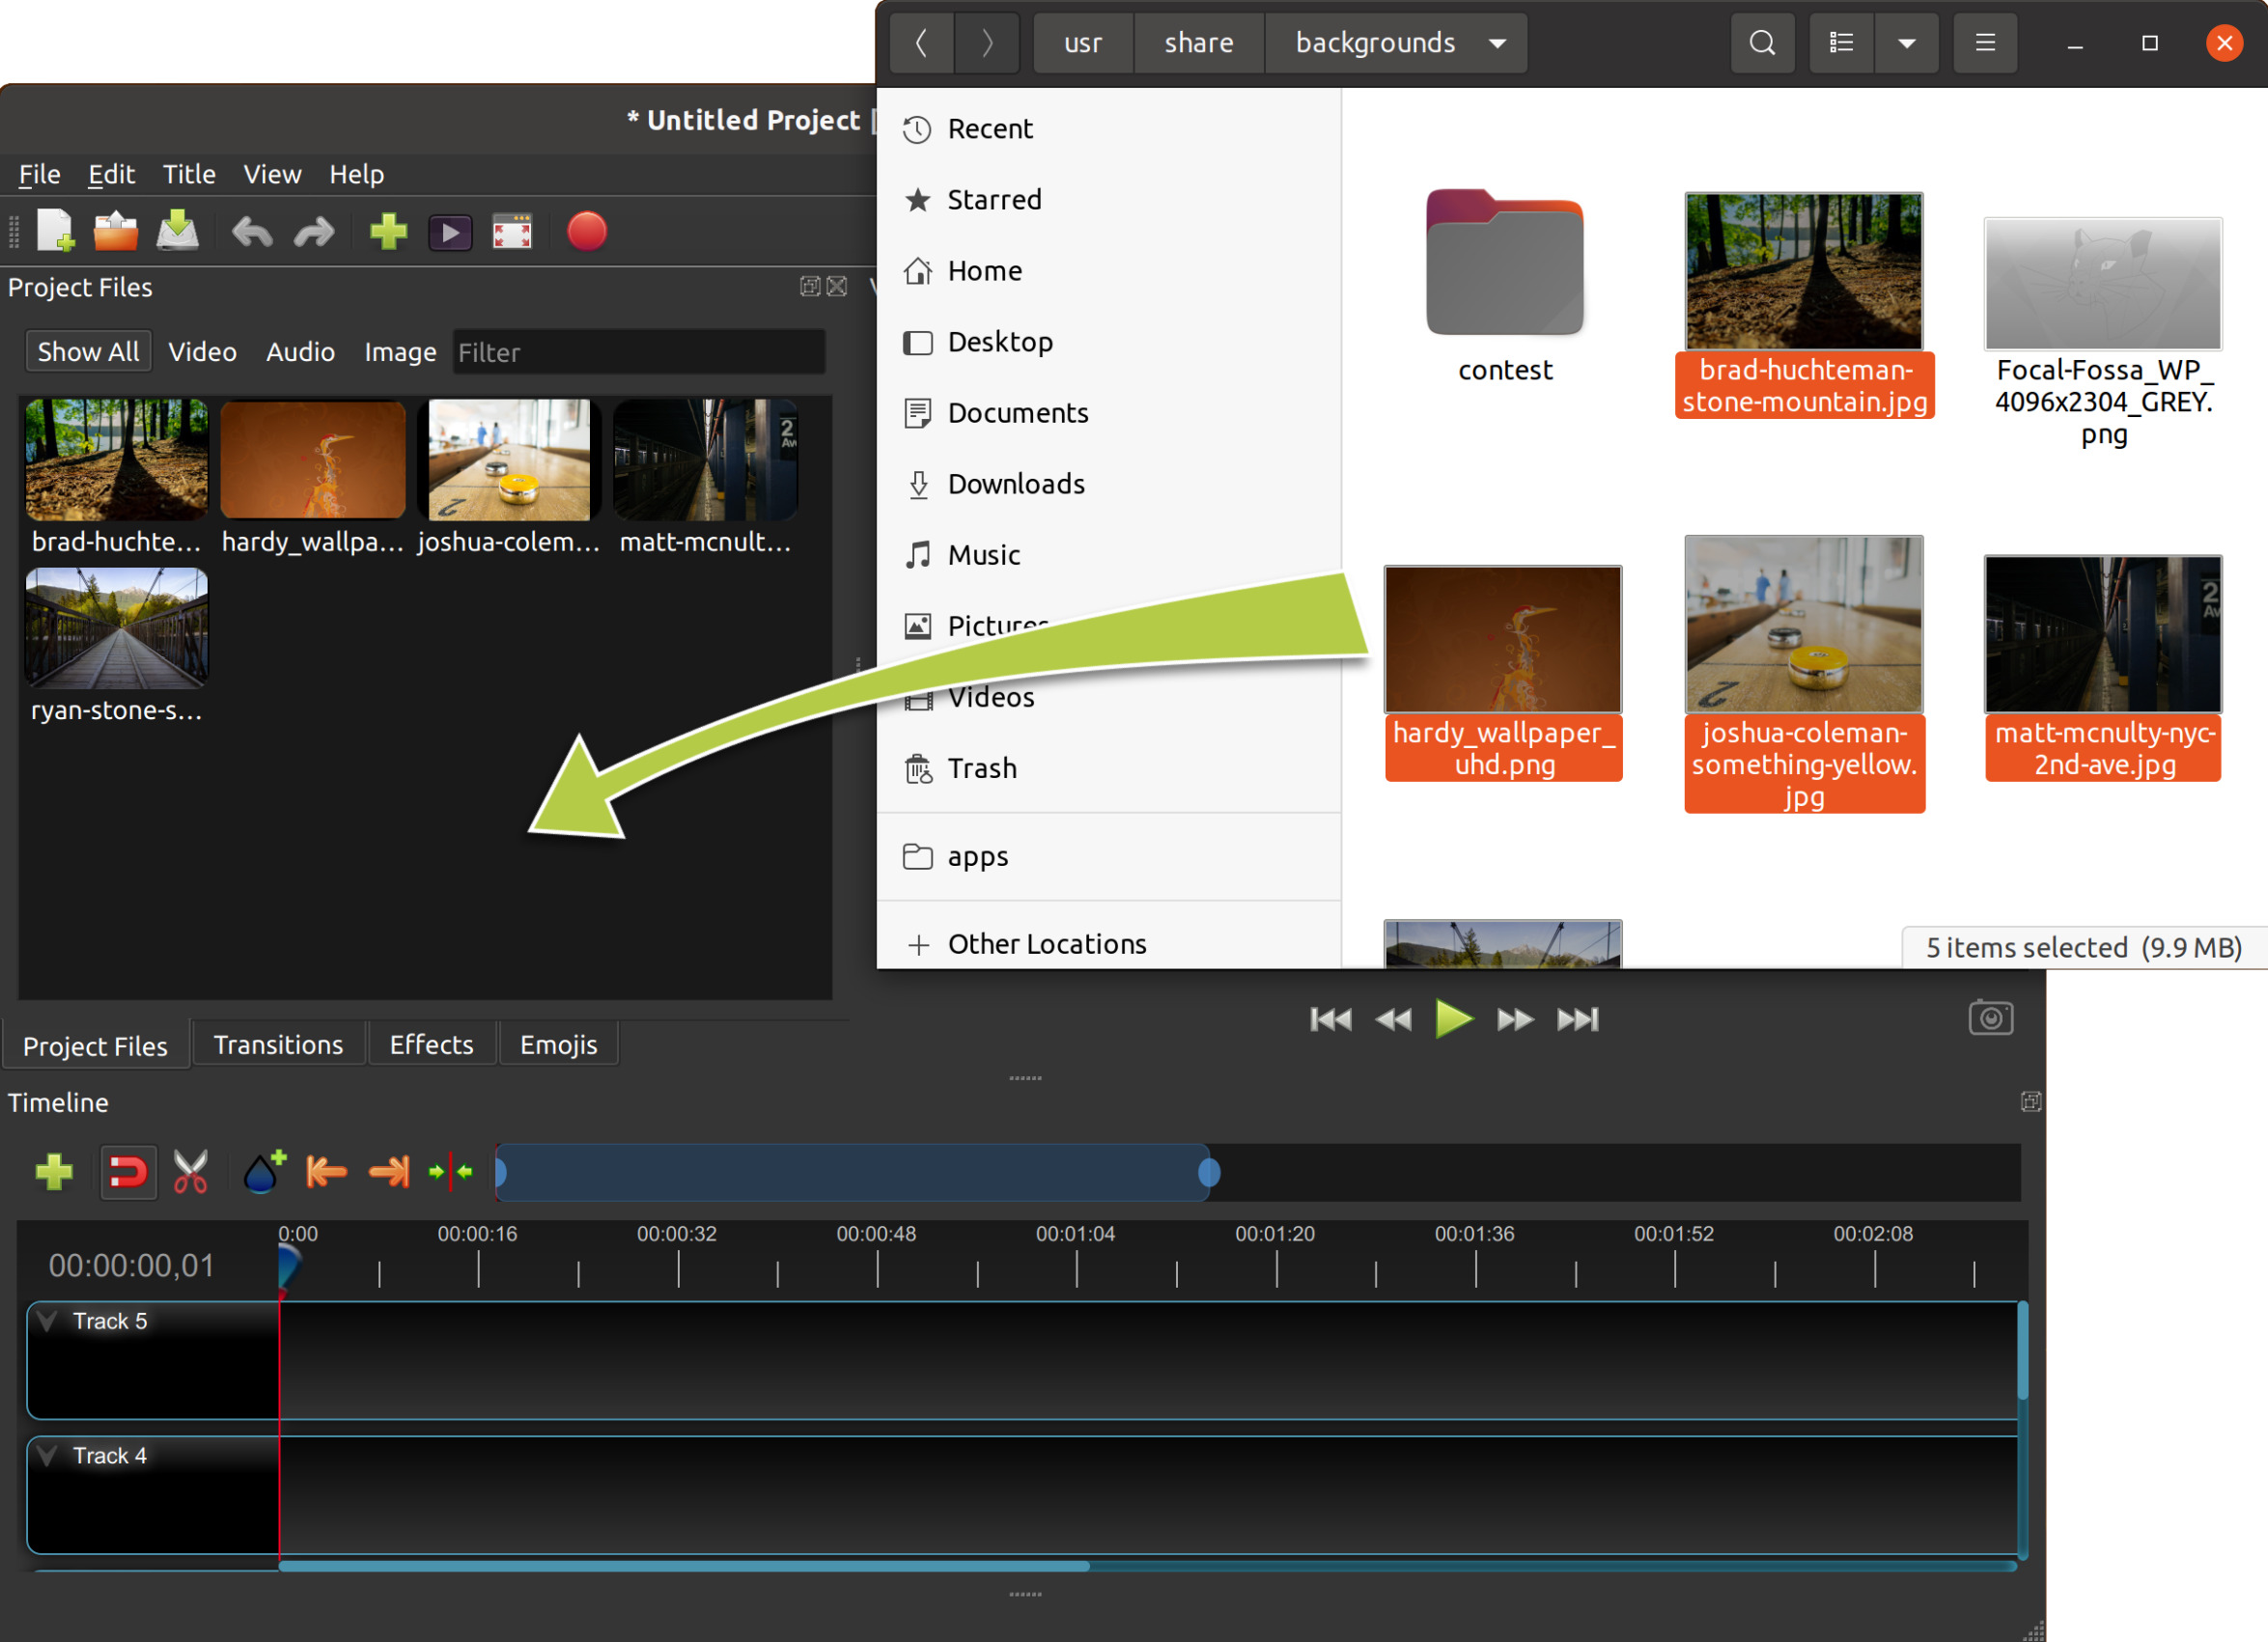
Drag and Drop |
Drag and drop the files from your file manager (file explorer, finder, etc…). |
Context menu (File Menu) |
Right click anywhere in the Project Files panel and choose Import Files. |
Main Menu |
In the main menu choose: File→Import Files. |
Toolbar button |
Click the + toolbar button in the main toolbar. |
Keyboard shortcut |
Press Ctrl-F (Cmd-F on Mac). |
Paste from Clipboard |
Press Ctrl-V (Cmd-V on Mac) to paste copied files from your clipboard. See Paste from Clipboard. |
Paste from Clipboard
You can paste files and clipboard media straight into OpenShot. If you copied one or more files in your file manager, switch to OpenShot and press Ctrl-V in the Project Files panel to add them, just like importing.
If you copied media data (for example, Copy Image in a web browser, a pasted frame from another app, or other image/audio/video clipboard data),
press Ctrl-V in OpenShot to create a file for that clipboard content. OpenShot saves a copy in a temporary folder:
.openshot_qt/clipboard/. The new file is then added to your project and appears in Project Files.
File Menu
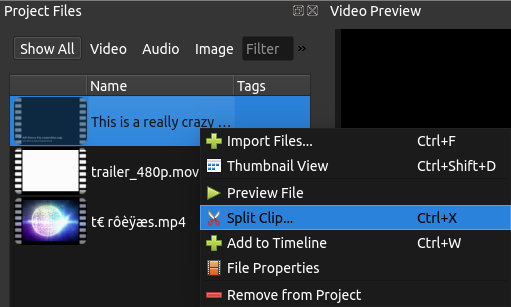
To view the file menu, right click on a file (in the Project Files panel). Here are the actions you can use from the file menu.
File Context Option |
Description |
|---|---|
Import Files… |
Import files into your project |
Create with AI / Enhance with AI (Optional) |
AI menu actions for generating or enhancing media files. These options are shown only when AI is enabled and the selected file type supports the workflow. See Advanced AI: ComfyUI. |
Details View |
Switch the Project Files panel to details view |
Preview File |
Preview a media file |
Split File |
Split a file into many smaller files. The new trimmed files appear in the Project Files list. |
Export Files |
Export selected files (and split segments) to a destination folder |
Add to Timeline |
Add many files to the timeline in one step, including transitions or alternating tracks. |
Choose Profile |
Change the current project profile to match the selected file. If the file’s profile does not match a known profile, it will give you the option to create a custom profile. |
File Properties |
View the properties of a file, such as frame rate, size, etc… |
Optimize |
Create, link, unlink, or delete optimized preview files for the selected video files. |
Remove from Project |
Remove a file from the project |
Edit Title |
Edit an existing title SVG file (shown when an SVG title is selected) |
Duplicate Title |
Make a copy, and then edit the copied title SVG file (shown when an SVG title is selected) |
Preview File
The Preview File action opens the Preview dialog for the selected file from Project Files. Simply double check a file to open this dialog.
Playback starts automatically.
Loop is enabled by default.
Press Space to toggle play/pause.
Use the mouse scroll wheel to zoom in/out.
A Reset Zoom button appears when zoom is not 100%, and resets to 100%.
Optimize
Optimized preview files are lower-resolution copies of your source video files (sometimes referred to as proxy files), used to improve editing responsiveness without changing the original media. They are especially helpful with large formats such as 4K, high frame rate, or high bitrate footage.
For video files, the file context menu includes an Optimize submenu. This feature creates or links smaller preview copies of your source clips, which can improve playback and scrubbing on slower systems or with high-resolution footage. Optimizing also pre-loads thumbnails to further improve the editing smoothness when zooming into the timeline.
The Optimize submenu contains these actions:
Action |
Description |
|---|---|
Optimize Video |
Create an optimized preview file for each selected video file. OpenShot stores these files in the project’s |
Link to Existing… |
Choose a folder containing already-created optimized files and link the best matching files to the selected source clips. This supports common proxy naming styles, known proxy suffixes, file ID suffixes, and extension changes. |
Unlink |
Remove the optimized preview link from the selected file without deleting the optimized file from disk. |
Delete & Unlink |
Delete the linked optimized file from disk, then remove the link from the selected file. |
When optimization is in progress, the submenu changes to a single Cancel action for the selected file(s). Optimized preview files are used only for editing and preview playback. Your final export still uses the original source files.
When you use Link to Existing…, OpenShot tries to match each selected source clip to an existing optimized
file in a safe order. It first looks for the same base filename with a different video extension, then for common
proxy-style names such as _proxy, _preview, _optimized, _lowres, resolution tags such as _720p
or _1080p, and camera/editor-style variants such as _p. It also supports names that add the OpenShot file ID
after a known proxy suffix, such as clip001_proxy_F1.mp4, and it can still match files named only by file ID,
such as F1.mp4.
Best practice when bringing your own optimized files is to keep the same base filename as the source clip and add a
clear proxy-style suffix, for example clip001_proxy.mp4 or clip001_proxy.mov. If you need to avoid filename
collisions, append the OpenShot file ID after the proxy suffix, for example clip001_proxy_F1.mp4. Avoid unrelated
suffixes such as _final or _reviewcopy, because OpenShot does not treat those as safe proxy naming patterns.
Split File
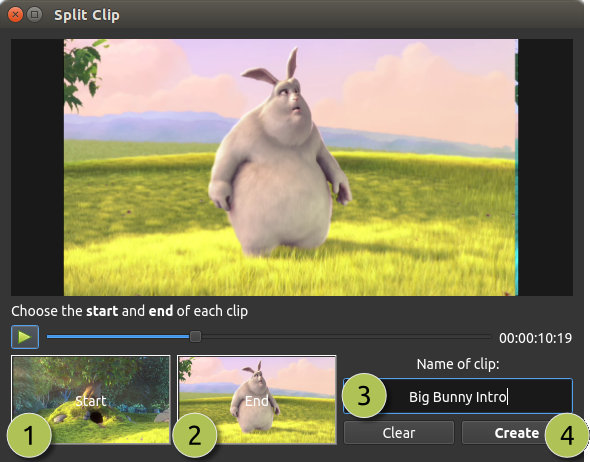
If you need to cut a large video file into many smaller files before editing, the Split File dialog is built exactly for this purpose. Right click on a file, and choose Split File. Use this dialog to quickly separate a large file into many smaller segments. For each segment, you can select the starting and ending frame, and a title. Each segment appears as a new file in the Project Files dialog.
# |
Name |
Description |
|---|---|---|
1 |
Start of File |
Choose the starting frame of your file by clicking this button |
2 |
End of File |
Choose the ending frame of your file by clicking this button |
3 |
Name of File |
Enter an optional name |
4 |
Create Button |
Create the file (which resets this dialog, so you can repeat these steps for each segment) |
Please refer to the section Trimming & Slicing for more ways to cut and slice clips directly in the timeline.
Export Files
If you want your split file segments available outside of your OpenShot project, or want to copy all your video assets to one place, you can do this with the Export Files dialog. Simply Ctrl+Click to select all the files you like, then Right Click and choose Export Files. In the dialog that appears, choose a destination folder, and click Export.
NOTE: This will export each file or file segment using its original video profile (width, height, framerate, aspect ratio, etc…). It also supports any Split File (described above). For example, if you have split a long video file into many different segments (and named them), you can now export all the segments as separate video files (using the original file’s video profile).
Add to Timeline
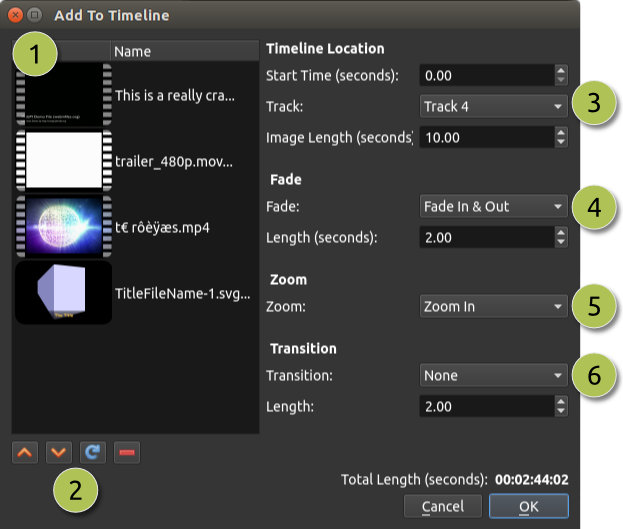
In certain cases, you might need to add many files to the timeline at the same time. For example, a photo slideshow, or a large number of short video clips. The Add to Timeline dialog can automate this task for you. First, select all files you need to add, right click, and choose Add to Timeline.
# |
Name |
Description |
|---|---|---|
1 |
Selected Files |
The list of selected files that need to be added to the timeline |
2 |
Order of Files |
Use these buttons to reorder the list of files (move up, move down, randomize, remove) |
3 |
Timeline Position |
Choose the starting position and track where these files need to be inserted on the timeline |
4 |
Fade Options |
Fade in, fade out, both, or none (only affects the image, and not audio) |
5 |
Zoom Options |
Zoom in, zoom out, or none |
6 |
Transitions |
Choose a specific transition to use between files, random, or none (only affects the image, and not the audio) |
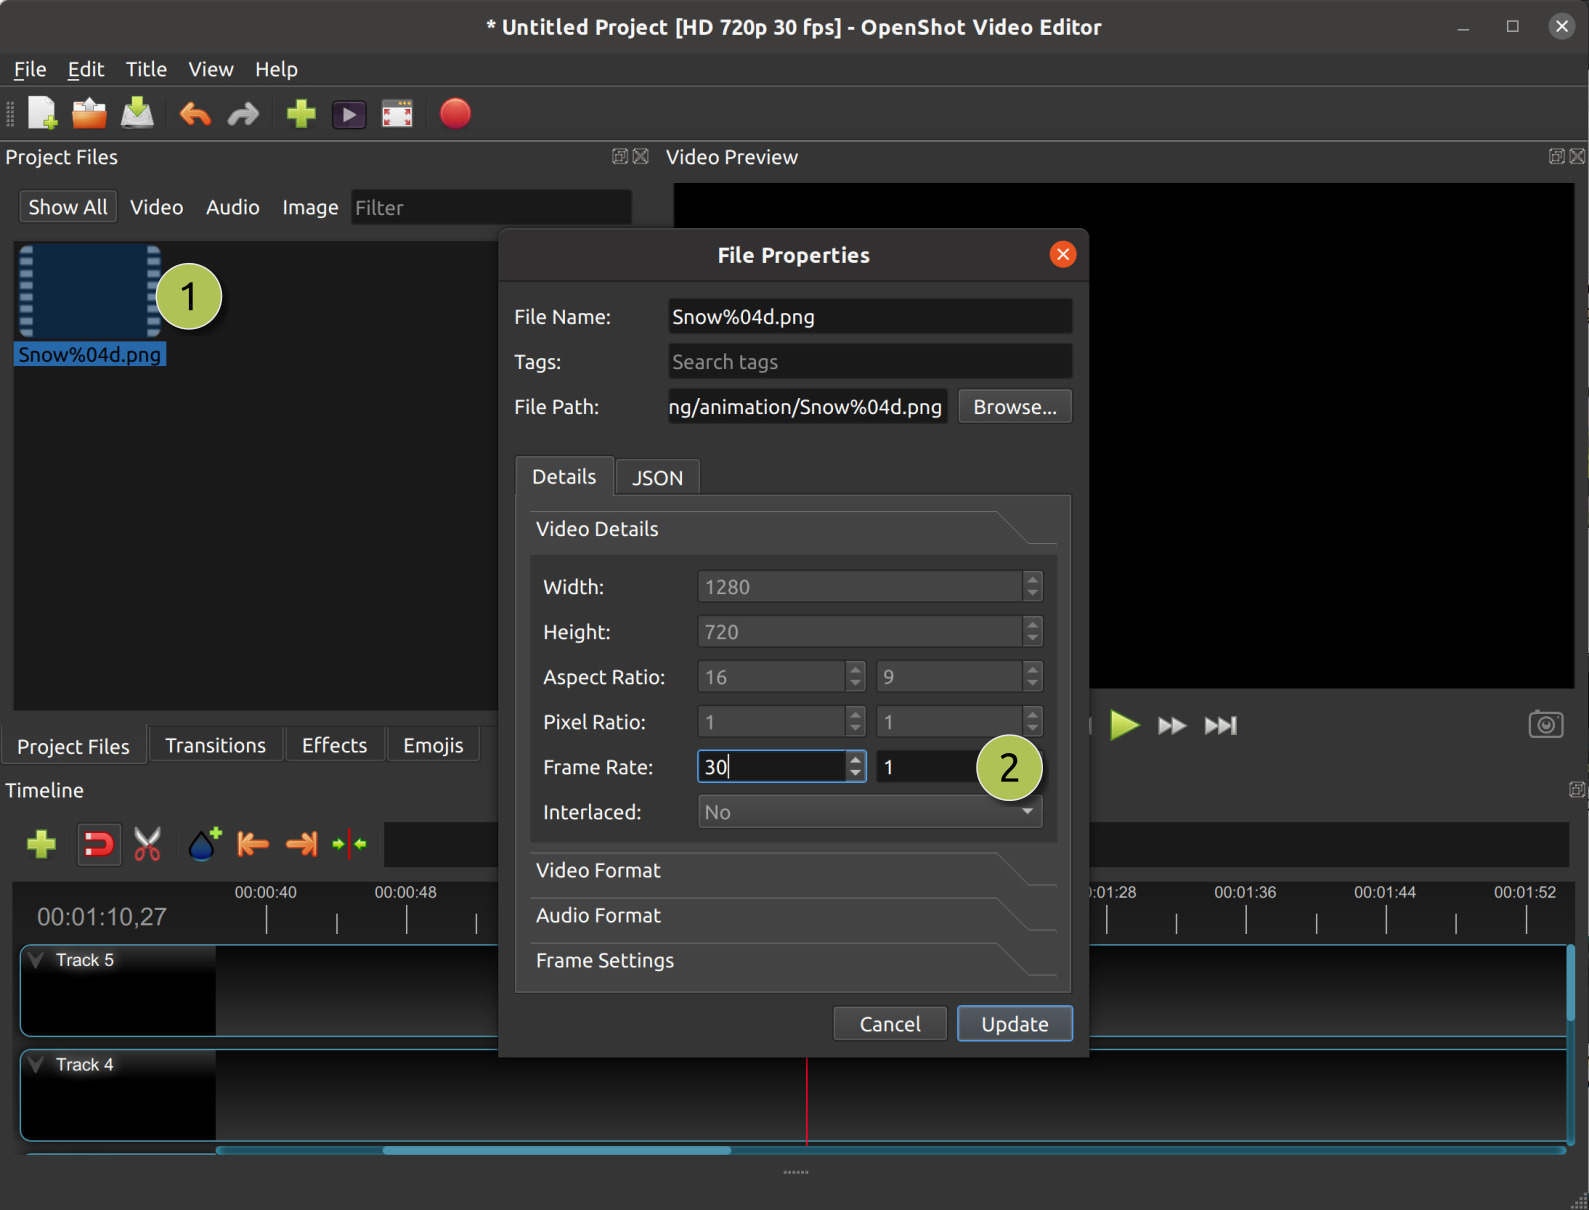
Properties
To view the properties of any imported file in your video project, right click on the file, and choose File Properties. This will launch the file properties dialog, which displays information about your media file. For certain types of images (i.e. image sequences), you can adjust the frame rate on this dialog also.
# |
Name |
Description |
|---|---|---|
1 |
File Properties |
Select an image sequence in the Project Files panel, right click and choose File Properties |
2 |
Frame Rate |
For image sequences, you can also adjust the frame rate of the animation |
Remove from Project
This will remove a file from the project. It will not delete the underlying physical file though, so removing a file from the project merely makes it unavailable for this video project.
Project Assets Folder
OpenShot creates and uses a few temporary working folders while you edit. These live under
.openshot_qt/ in your user profile and hold project-specific files that OpenShot generates for you:
.openshot_qt/blender/- Blender animation renders created by the Animated Title dialog.openshot_qt/title/- SVG title files created by the Title dialog.openshot_qt/thumbnail/- Thumbnails generated for Project Files and Timeline.openshot_qt/clipboard/- Media created from clipboard pastes (images, audio, or video that must be saved to disk first).openshot_qt/optimized/- Optimized preview files created for smoother editing.openshot_qt/protobuf_data- Tracking and object detection data
When you choose File→Save As, OpenShot copies these folders into your project directory, inside a single folder named
PROJECTNAME_Assets. For example: MyProject_Assets/clipboard will contain any media you pasted from the clipboard,
and MyProject_Assets/optimized will contain any optimized preview files linked to the project.
As part of this process, all paths inside your *.osp project file are updated to be relative to your project folder.
Missing Files
When you create and save a project in OpenShot, any files imported into the software (such as videos, audio, and images) must remain accessible throughout the project’s duration. This means that these imported files should not be renamed, deleted, or moved to different folders. Additionally, the full path where these files are located should not be renamed either. This principle applies to other video editing software as well.
For example, users might move or delete folders, unplug their USB devices, or move or delete their project files. Any of these examples cause a Missing File message, in which OpenShot prompts you to locate the folder of the missing file(s). Depending on the number of files you added to your project, OpenShot could prompt you many times to find the missing files.
When OpenShot saves a project, all file paths are converted to relative file paths. As long as you keep all assets organized in the same parent folder (including the *.osp project file), you will be able to move your project folder without triggering any missing file(s) prompts. You can even move a self-contained project folder to another computer without any issues.
Everyone has their unique way of organizing files, and it’s crucial to remember not to make changes to file paths, rename files, or delete files when working with video editors, as it can lead to missing file issues. For a detailed guide on missing file(s), see The Case of “Missing Files”!